| English | Korean | Chinese | Japanese |
Chapter 2. Configuration: Event
Set up Event Detection
1. AI Event Detection
For more information, please refer to:
Medium article: AI-Powered Event Detection with ChatGPT
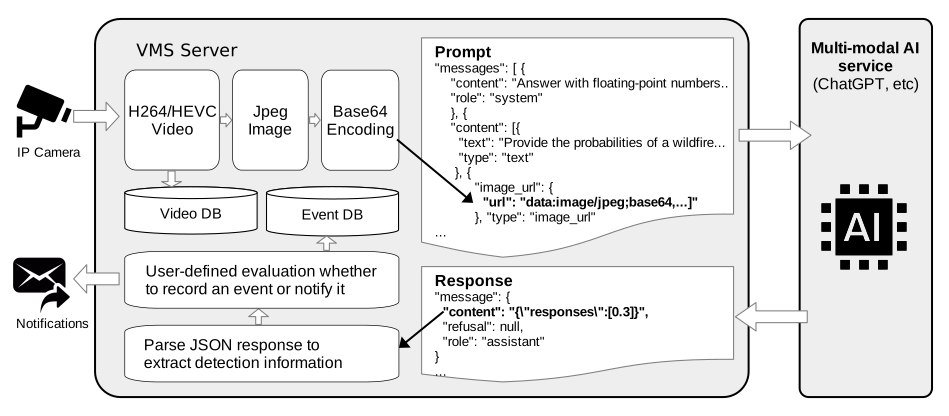
a. Click the  button to add a new item and select a template. Each template provides a different service and response from the AI models, such as a true/false response for detecting people involved in a fight, or the probability of a wildfire in a mountain image.
b. Click on an item and choose "Edit" to view the form.
① Description: A short description of the AI event detection item.
② Event Label: The label displayed in the event list, including option titles. Select it from the "User-defined Event Label" list.
③ Interval and Short Interval: The interval (in seconds) between sending an image to the AI model. Once an event is detected, the short interval is applied until the event ends.
④ Image Width and Height: The resized dimensions of the image to be sent to the AI model.
⑤ URL, API Key, and AI Model: Information required to access the AI service.
⑥ Max Token: The maximum token size for responses.
⑦ Response Format and System Content: The format of the response from the AI model, and system content that instructs the AI model on the expected response format.
⑧ User Content: The specific query or instruction for the AI model. This should be clear, detailed, and tailored to elicit the desired response. Ensure the content is concise yet comprehensive to maximize the accuracy and relevance of the AI's output.
⑨ Input Token and Output Token Price: The cost per million tokens for the specified AI service. The daily total expenses will be logged.
⑩ Notification Group: The group to notify in the event.
⑪ Evaluation: A user-defined program to evaluate whether to record or notify an event. Click the "?" button in the top-right corner to open the help menu.
c. Click on an item and choose "Test" to view the test form.
① On the left side, you’ll see the prompt that will be sent to the AI service.
② Drag an image into the image area and choose whether to resize it.
③ Click the "Test" button to send the query. After a short while, the AI model’s response will be displayed in the response control. Below the response control, you can view the result based on your configuration.
④ Click the button in the bottom-right corner to copy the contents to the clipboard.
d. Once you define an AI Event Detection item, such as ‘openai00,’ you can assign it to a video channel. In the "Device" menu, select a video channel and choose the item from the "Motion Handler" combobox.
e. You can check the event detection results by clicking the "Event List"  button on the title bar.

2. User-defined Event Label
a. Click the button to add a new item and select one from the list.
b. Edit the event title. If you want to add options, edit the option titles as needed. You can add up to four options.
3. Event Settings
a. Show Event List on Event: Choose whether to show the Event List when an event occurs.
b. Show Event Setup Button: Choose whether to show the Event Setup button on the live video.
c. Enable PC Alarm Sound: Choose whether to play a PC alarm sound on event.
d. Alarm Check Duration (A) / Start Condition (B): Alarm starts when the total duration of events is longer than (B) seconds during the previous (A) seconds.
e. Custom Events: Register your own custom events that can be used to handle events generated by Python programs.
Video Event Setup in VMS
1. Motion Event (Software Detection)
a. Once you choose "SW Detection" in the Device section, you can find the Setup button on the live channel. Click the  button to show the Event Setup dialog.
b. In the Event Setup dialog, you can add a new detection region by choosing a shape from the drawing tools. You can choose a rectangle, ellipse, or polygon.
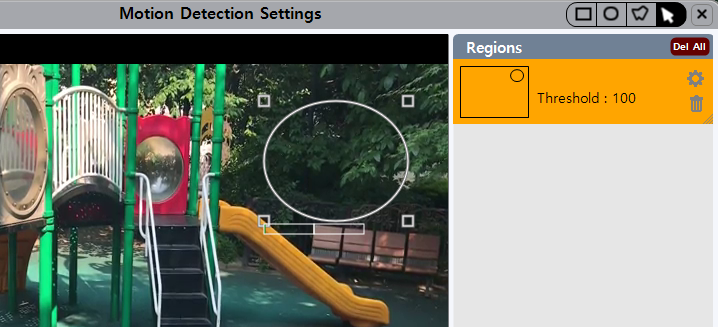
c. Adjust the position and area of the region by dragging the handles on the corners.
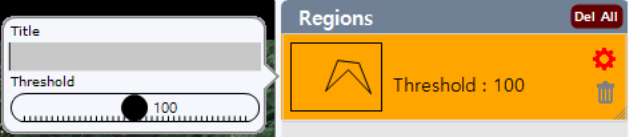
d. Change the title and the threshold value for motion detection. The higher the threshold value, the less sensitive the detection.